How to Read Chord Diagrams for Mandolin
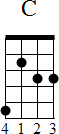
Chord diagrams are one of the most common ways of displaying mandolin chords. A chord diagram is a visual representation of a mandolin fretboard with vertical and horizontal lines along with various symbols. An example of a chord diagram is shown below:
Chord Symbol
A chord symbol is placed above the chord diagram to indicate the type of chord.

Horizontal and Vertical Lines
Vertical lines are strings. Starting with the leftmost line, the lines represent the strings in the following order: G, D, A, and E.

Horizontal lines represent frets. Diagrams often appear with a thick top line which is the nut. This indicates that the diagram starts at the first fret:

Many chords start higher on the neck. This is specified with a number and the abbreviation 'fr'. The number indicates the fret. The top line will also be the same thickness as the other lines when a number is included. The example below indicates that the chord starts at the fifth fret

Dots
Dots are placed on the diagram to indicate which notes and strings to fret as part of the chord. The diagram below shows the G string fretted at the third fret and the other strings at the first fret:

Circles
Circles are placed at the top of the chord diagram to indicate an open string. Many chords include both fretted and open strings, so you will see a combination of dots and circles. The diagram below indicates that the G and E strings should both be played open:

Xs
An 'X' is used to indicate that a string should not be played. In the following example, the X means that the G string shouldn't be played:

Curved Lines
A curved line is used to indicated a barre. A barre is when you play several strings at the same fret using the same finger. This requires you to flatten the finger to allow you to press each string down. The curved line appears at the top of the diagram and spans the strings that should be barred. The G and D strings are to be barred in the example below:

Fingering
Numbers are used to indicate which fingers to use to play each note in the chord. The numbers may be placed in different location depending on the source. Our diagrams include the finger numbers in the black dots as white text. However, other diagrams may place the numbers at the top or bottom of the diagram next to the string where each finger is placed. Open strings won't have any numbers. The fingers are numbered as follows:
- 1 - index
- 2 - middle
- 3 - ring
- 4 - pinky
Variations
There are many variations on where and how these symbols appear. This guide is based on the chord diagrams used on mandolinchords.net. However, you may encounter chord diagrams elsewhere that deviate somewhat from our diagrams. It is generally very easy to understand these variations provided you understand the basic concepts in this lesson.
Some common variations are the location of fingering numbers, inclusion of additional information (such as the pitches of the notes in the chord), etc.